The Ascent of Plastic
From PyroGuide
The advantages of plastic hardly needs repeating, they can be assembled in a fraction of the time of paper shells and the cost of plastic shells is considerably less than the imported strawboard hemispheres from Japan.
The chief stumbling block of plastic shells is the difficulty of achieving a good symmetric break from them. The key to the solution to this problem lies in three areas:
- 1. The arrangement of stars in the shell
- 2. The type of burst charge used
- 3. The method of joining the hemispheres
[edit] 1. Loading the Stars
The most perfect burst symmetry will occur when the stars are loaded only one layer deep against the inside wall. This arrangement assures that each star will be given a nearly equal velocity as in a paper chrysanthemum shell. A greater star density can be achieved by filling both hemispheres full of stars. In that case the stars in the center will have a very low outward push and will tend to dump downward if the shell bursts at the apex of its trajectory. The overall effect will still look basically symmetric if the proper burst charge is used. An uneven distribution of stars in the shell will nearly always reduce a non-symmetric spray type burst.
Figure 1 shows an unevenly filled shell with the stars occupying only one hemisphere (the burst is unspecified). The explosive compression begins at area A causing the shell to fracture at its weakest point, which will be along the wall unoccupied by stars. The explosive energy of the burst is largely wasted with only a fraction of the energy delivered to the stars resulting in a spraying or dumping type burst.
[edit] 2. Burst Charges
A great deal of burst charges are available: H3, flash powder, flash powder on rice hulls, benzoate whistle comp, used alone or on rice hulls, KP burst etc. It is wise to experiment with different types and quantities of burst charge to get some familiarity with the properties of various compositions. The general rule to follow is to increase the energy of the burst charge with decreasing shell diameter. I have listed various burst charges in the table below in the order of decreasing burst energy.
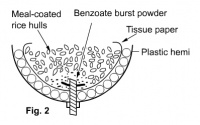
Whistle comp appears to be the optimal burst for 3 and 4 inch shells, giving the most consistent result's. It can be used as a one powder or coated on rice hulls. One method is simply dumping the powder on the cross matched fuse and packing the interior with meal coated rice hulls as shown in figure 2. Use two teaspoonfuls of benzoate burst or about 10 gm in either a 3 or 4 inch plastic shell.
Whilst comp must be well mixed to burn properly. Pass the mix through a 40-50 mesh screen 5 times before using, then test its burning rate by packing in a cardboard spoolette. It should burn at 6.4-6.6 mm/sec. In humid climate use potassium benzoate instead of the sodium salt.
[edit] 3. Joining the hemispheres
Now the trickiest part of the plastic story. Two schools of thought exist in the finishing process of plastic round shells. Over half of the plastic shell builders glue the hemisphere together, then wrap with various kinds of tape to various thickness's. For example, apply Duco Contact Cement to the seam with the shell almost closed and then squeezes tight - holding for about 60 seconds. Then wrap with two layers of masking tape. Buffs the tape down with a hardwood block sander to smooth it out. The shell breaks symmetrically and when recovered only a ring consisting of the glued joint is left.
However in the interest of speed and efficiency do away with the tape entirely. Assemble the two halves using a thin plastic sheet covering the hemisphere that is flipped upside down. Align the halves and pull out the plastic sheet and snap them almost together. Then dip a cotton swab in methylene chloride and apply to the joint quickly. The shell is snapped together and held tight for 30 seconds, If the shell is a 3" plastic grab it by the fuse and dunk it into a large glass of solvent so that the shell is covered to within 1" of the top where you are holding the fuse.
The shell is rotated for 30-45 seconds and pulled out. Stand it up carefully on a plastic sheet until it is dry. This process fuses the joint together, very effectively reducing the inherent weakness of the joint in an effort to obtain nearly uniform wall strength. If the shell is 4", which comes with a convenient plastic ring which is glued to the top, rotate the shell horizontally in a bath of solvent as shown in figure 3. After 1.5 minutes pull the shell out and hang it up to dry, A shell is not fully dry until you can not scratch it with your fingernail on the seam. After cross hatching the fuse put the lift charge in a paper cup, trim off the excess height of the cup with scissors and swab a circular area around the fuse with solvent, then glue the cup down. The shell leader is passed through the loop and into a hole or slot in the lift cup and taped down.
A final note of warning: One cannot allow solvent to soak the fuse or get into the shell (which is easy to spot as air bubbles form at the seam when wet with solvent). If this happens the shell is ruined and should be taken apart or safely destroyed.
[edit] References
DB, The Best Of AFN II. USA: Dingmans Ferry, American Fireworks News, 2001, pp. 110-111.


